
생각해보기
모던 자바 인 액션 -8- 본문
람다, 메서드 참조, 스트림 등의 기능을 이용해 리팩터링하는 방법
코드의 가독성 개선
코드의 가독성이란 : 어떤 코드를 다른 사람도 쉽게 이해할 수 있는 것이다.
자바8 기능을 이용해 코드 가독성을 개선하는 방법
- 익명 클래스를 람다 표현식으로 리팩터링하기
- 람다 표현식을 메서드 참조로 리팩터링하기
- 명령어 데이터 처리를 스트림으로 리팩터링하기
* Java 멀티 쓰레드
하지만 멀티 스레드 애플리케이션에서는 실행 중인 스레드가 하나라도 있다면, 프로세스는 종료되지 않는다.
메인 스레드가 작업 스레드보다 먼저 종료되더라도 작업 스레드가 계속 실행 중이라면 프로세스는 종료되지 않는다.
익명 클래스를 람다 표현식으로 리팩터링
// 익명 클래스 기존 코드
new Thread(new Runnable() {
    @Override
    public void run() {
        System.out.println(Thread.currentThread().getName() + " test");
    }
}).start();
// 람다 표현식
new Thread(()->System.out.println(Thread.currentThread().getName() + " test")).start();
* 주의할 점
- 익명 클래스에서 사용한 this와 super은 람다 표현식에서 다른 의미를 갖는다. 익명 클래스에서 this는 익명 클래스 자기 자신을 가리키지만 람다에서 this는 람다를 감싸는 클래스를 가르킨다.
- 익명 클래스는 감싸고 있는 클래스의 변수를 가릴 수 있다. 하지만 람다 표현식으로 변수를 가릴 수 없다.
- 익명 클래스를 람다 표현식으로 바꾸면 콘텍스트 오버로딩에 따른 모호함이 생길 수 있다. 람다 형식은 콘텍스트에 따라 달라진다.
int original = 10;
new Thread(new Runnable() {
    int original = 10; // 가능하다
    @Override
    public void run() {
        System.out.println(Thread.currentThread().getName() + " test");
    }
}).start();
new Thread(()-> {
    int original = 10; // 컴파일 에러 발생
    System.out.println(Thread.currentThread().getName() + " test");
}).start();
interface Task{
public void execute();
}
public static void doSomething(Runnable r){r.run()};
public static void doSomething(Task r){r.execut()};
// 익명 클래스의 경우 // Task 구현 익명 클래스
doSomething(new Task(){
@Override
public void execute(){
System.out.println("test");
}
});
// 익명 클래스 람다 표현식 변경시 문제 // Runnable 구현인지 Task구현인지 모호
doSomething(()->System.out.println("test"));
// 해결
doSomething((Task)()->System.out.println("test"));
람다 표현식을 메서드 참조로 리팩터링하기
람다 표현식 대신 메서드 참조를 이용하면 가독성을 높일 수 있다
// Apple 클래스는 getWeight()라는 함수가 있다

// 람다 표현식
inventory.sort(
	(Apple a1, Apple a2) -> a1.getWeight().compareTo(a2.getWeight()));

// 메소드 참조
invetory.sort(comparing(Apple::getWeight));
명령어 데이터 처리를 스트림으로 리팩터링하기
반복자를 이용한 컬렉션 처리 코드를 스트림 Api로 변경하는 것이 좋다. Stream api를 통해 데이터 처리 파이프라인의 의도를 명확하게 보여 줄 뿐만아니라 쉽게 병렬화 할 수 있다.
// 기존의 코드
List<String> dishNames  = new ArrayList<>();
for(Dish dish : menu){
    if(dish.getCalories()>300)
        dishNames.add(dish.getName());
}
// 개선된 코드
// 전체 파이프라인의 의도를 쉽게 알 수 있다
menu.stream(). // parallelStream()으로 변경하여 쉽게 병렬화 가능하다
        filter(dish -> dish.getCalories()>300)
        .map(Dish::getName)
        .collect(toList());
실행 어라운드 패턴
매번 같은 준비, 종료과정을 반복적으로 수행하는 코드가 있다면 람다로 변환가능
@FunctionalInterface
interface extcuteLambda{
    String process();
}

// 클래스 안에
public static String process(extcuteLambda s){
        return "log: " + s.process();
}

// 실제 실행
// ()는 함수형 인테페이스에 매개 변수, -> 이후는 return 값
String s = process(() -> "sss"); // output "log: sss"
람다로 객체지향 디자인 패턴 리팩터링하기
디자인 패턴에 람다 표현식이 더해지면 색다른 기능을 발휘할 수 있다.
전략(strategy) 패턴
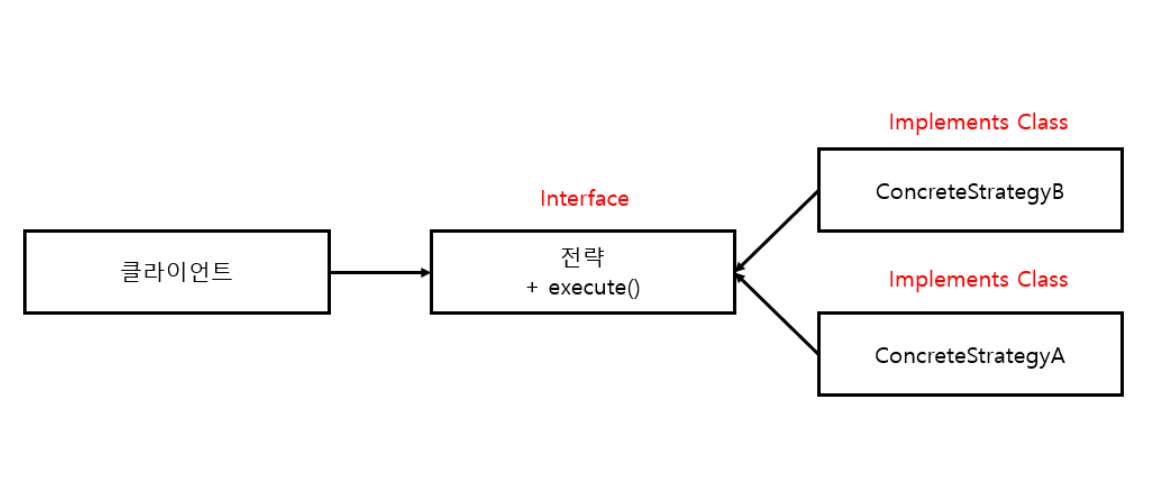
구성
- 알고리즘을 나타내는 인터페이스(Stragegy 인터페이스)
- 해당 인터페이스 구현체들(구체적인 구현 클래스)
- 전략 객체를 사용하는 클라이언트
기존의 전략 패턴
// 예시 String 포맷을 다양한 조건에 맞게 검증해야 한다
// strategy 패턴 사용
interface StrategyPattern{
    boolean execute(String s);
}
// 모든 글자 소문자 검증
class IsAllLowerCase implements StrategyPattern{

    @Override
    public boolean execute(String s) {
        return s.matches("[a-z]+");
    }
}
// 모든 글자 숫자 검증
class IsNumeric implements StrategyPattern{

    @Override
    public boolean execute(String s) {
        return s.matches("\\d+");
    }
}
class Validator{
    private final StrategyPattern strategyPattern;
    public Validator(StrategyPattern strategyPattern) {
        this.strategyPattern = strategyPattern;
    }
    public boolean validate(String s){
        return strategyPattern.execute(s);
    }
}
public class StrategyPatternRunner{
    // 람다 사용 x
    Validator validatorNumeric = new Validator(new IsNumeric());
    boolean v1 = validatorNumeric.validate("test"); // true
    Validator validatorLowerCase = new Validator(new IsAllLowerCase());
    boolean v2 = validatorLowerCase.validate("test"); // false;
}
많은 클래스를 구현해야 해서 코드가 복잡해진다. 람다를 사용하면 코드가 간결해진다
람다 사용 Strategy 패턴
// strategy 패턴 사용
interface StrategyPattern{
    boolean execute(String s);
}
public class StrategyPatternRunner{
    // 람다 사용
    Validator validatorNumeric = new Validator((String s)-> s.matches("[a-z]+"));
    boolean v1 = validatorNumeric.validate("test"); // true
    Validator validatorLowerCase = new Validator((String s)-> s.matches("\\d+"));
    boolean v2 = validatorLowerCase.validate("test"); // false;
}
템플릿 메서드
주요한 알고리즘을 사용하고 일부만 고쳐야 하는 유연함을 제공해야 할때 템플릿 메서드를 사용한다.
기존의 템플릿 방법
abstract class TemplateMethod{
    public void mainLogic(int number){
        System.out.println("execute mainLogic");
        additionAfterLogic(number);
    }
    abstract void additionAfterLogic(int s);
}
class Test extends TemplateMethod{

    @Override
    public void additionAfterLogic(int s) {
        System.out.println("test " + s);
    }
}
class Debug extends TemplateMethod{

    @Override
    public void additionAfterLogic(int s) {
        System.out.println("debug " + s);
    }
}
public class TemplateMethodRunner {
    public static void run(){
        TemplateMethod templateMethodTest = new Test();
        templateMethodTest.mainLogic(10);
        TemplateMethod templateMethodDebug = new Debug();
        templateMethodDebug.mainLogic(10);
    }
}
람다 사용한 템플릿 메서드 패턴
class TemplateMethod{
    public void mainLogic(int number, Consumer<Integer> additionAfterLogic){
        System.out.println("execute mainLogic");
        additionAfterLogic.accept(number);
    }
}
public class TemplateMethodRunner {
    public static void run(){
        TemplateMethod templateMethodTest = new TemplateMethod();
        templateMethodTest.mainLogic(10,i -> System.out.println("test " + i));
        TemplateMethod templateMethodDebug = new TemplateMethod();
        templateMethodDebug.mainLogic(10,i -> System.out.println("debug " + i));
    }
}
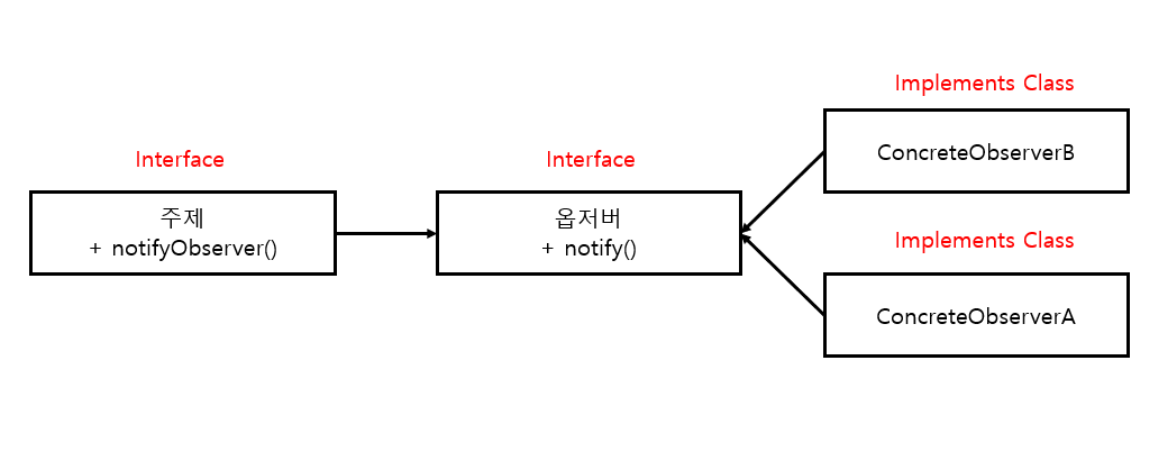
옵저버
어떤 이벤트가 발생했을 때 한 객체가 다른 객체 리스트에게 자동으로 알림을 보내야 하는 상황에서 옵저버 디자인 패턴을 사용한다.
기존의 Observer 방법
interface UserObserver{
    // public abstract 생략된 것
    void notifying(String text);
}
class News implements UserObserver{

    @Override
    public void notifying(String text) {
        System.out.println("news " + text);
    }
}
class Internet implements UserObserver{

    @Override
    public void notifying(String text) {
        System.out.println("internet " + text);
    }
}
class Phone implements UserObserver{

    @Override
    public void notifying(String text) {
        System.out.println("phone " + text);
    }
}
class Subject{
    private final List<UserObserver> observers = new ArrayList<>();
    public void registerObserver(UserObserver o){
        observers.add(o);
    }
    public void notifyObservers(String text){
        observers.forEach(o->o.notifying(text));
    }
}
public class ObserverRunner {

    public static void run() {
        Subject subject = new Subject();
        subject.registerObserver(new News());
        subject.registerObserver(new Phone());
        subject.registerObserver(new Internet());
        subject.notifyObservers("observer!");
    }
}
람다 사용한 옵저버 패턴
interface UserObserver{
    // public abstract 생략된 것
    void notifying(String text);
}

class Subject{
    private final List<UserObserver> observers = new ArrayList<>();
    public void registerObserver(UserObserver o){
        observers.add(o);
    }
    public void notifyObservers(String text){
        observers.forEach(o->o.notifying(text));
    }
}
public class ObserverRunner {

    public static void run() {
        Subject subject = new Subject();
        subject.registerObserver((String text)-> System.out.println("news " + text));
        subject.registerObserver((String text) -> System.out.println("phone " + text));
        subject.registerObserver((String text) -> System.out.println("internet " + text));
        subject.notifyObservers("observer!");
    }
}
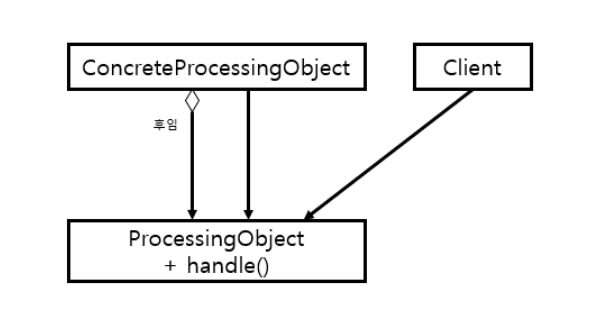
의무 체인
작업 처리 객체의 체인(동작 체인 등)을 만들 때는 의무 체인 패턴을 사용한다. 한 객체가 어떤 작업을 처리한 다음에 다른 객체로 결과를 전달하고, 다른 객체도 해야 할 작업을 처리한 다음 다른 객체로 전달하는 것이다.
기존의 방법
abstract class ProcessingObject<T>{
    protected ProcessingObject<T> successor;
    public void setSuccessor(ProcessingObject<T> successor) {
        this.successor = successor;
    }
    public T handle(T input){
        T r = handleResult(input);
        if( successor != null){
            return successor.handle(r);
        }
        return r;
    }
    abstract protected T handleResult(T t);
}

class handlerOne extends ProcessingObject<String>{

    @Override
    protected String handleResult(String s) {
        return s+ "handlerOne\n";
    }
}
class handlerTwo extends ProcessingObject<String>{

    @Override
    protected String handleResult(String s) {
        return s+ "handlerTwo\n";
    }
}
public class ChainOfResponsibilityRunner {
    public static void run() {
        ProcessingObject<String> handlerOne = new handlerOne();
        ProcessingObject<String> handlerTwo = new handlerTwo();
        handlerOne.setSuccessor(handlerTwo);
        String end =  handlerOne.handle("시작\n");
        System.out.println(end);
    }
}
람다를 사용한 의무 체인 패턴
public class ChainOfResponsibilityRunner {
    public static void run() {
        // 람다 사용
        UnaryOperator<String> handlerOne = (String text) -> text + "handlerOne\n";
        UnaryOperator<String> handlerTwo = (String text) -> text + "handlerTwo\n";
        Function<String,String> pipline = handlerOne.andThen(handlerTwo);
        String end = pipline.apply("시작\n");
        System.out.println(end);
    }
}
* 커스텀 인터페이스
이와 같이 커스텀 인터페이스를 정의하여 사용할 수 있다.
@FunctionalInterface
interface CustomFunctionalInterface<T,U,V,R>{
   R apply(T t, U u, V v);
}
public class CustomFunctionalInterfaceRunner<T,U,V,R>{
   public static void run(){
      CustomFunctionalInterface<String,String,String,String> t = (String i, String v, String c)-> i+v+c;
      String apply = t.apply("custom ", "function ", "interface!");
      System.out.println(apply); // output : custom function interface!
   }
}
디버깅
스택 트레이스
람다 표현식은 이름이 없기 때문에 조금 복잡한 스택 트레이스가 생성된다. 메서드 참조를 사용해도 스택 트레이스에는 메서드명이 나타나지 않는다. ( 다만 매서드 참조를 사용하는 클래스와 같은 곳에 선언되어 있는 메서드를 참조할 때는 매서드 참조 이름이 스택 트레이스에 나타난다)
정보 로깅 - peek
스트림의 파이프라인 연산을 디버깅했을 때 forEach를 사용해 결과를 스트림의 결과를 출력할 수 있다. forEach를 사용할 경우 전체 스트림이 소비되기 때문에 스트림 파이프라인에 적용된 각각의 연산에 대해서는 볼 수가 없다.
peek 연산자는 스트림의 각 요소를 소비한 것처럼 동작을 실행한다. 하지만 forEach처럼 실제로 요소를 소비하지 않는다. peek은 자신이 확인한 요소를 파이프라인의 다음 연산으로 그대로 전달한다. (peek 연산은 최종 연산자가 아니기 때문에 최종 연산자가 필요하다.)
.
'자바' 카테고리의 다른 글
| 모던 자바 인 액션 -10- (0) | 2021.12.19 |
|---|---|
| 모던 자바 인 액션 -9- (0) | 2021.12.19 |
| 모던 자바 인 액션 -7- (0) | 2021.12.17 |
| 모던 자바 인 액션 -6- (0) | 2021.12.10 |
| 모던 자바 인 액션 -5- (0) | 2021.12.10 |

